

Split-Rail Vegetable Garden Fence
Our home in King of Prussia, PA is located on a 7,900 square-foot lot. The house is setback from the street so that about 2/3 of our property is in front of the house and 1/3 is behind. The photos I have shown from our garden thus far are of the “backyard” which is the smaller of the two spaces. Because the houses are so close together, we don’t really have any side yard at all, only a small strip of grass connecting the front yard and back.
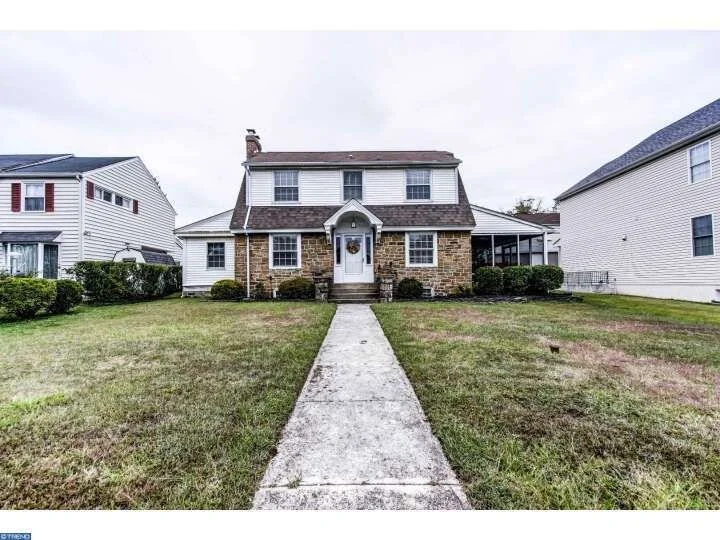
As you can see in the pictures below from the 2015 real estate listing, the front yard had very little landscaping, so we have been working with a relatively blank space.


Over the last two weeks, Alex and I have been working to add a vegetable garden to the left side of the walkway. Last year, we had two vegetable garden beds that floated in the middle of the lawn. We added two more beds, a wood chip surround, and fenced the space in with a split-rail fence that we purchased from Rusticraft Fence in Malvern, PA.
The first step to creating a vegetable garden to remove any grass in the area with a hoe. You can see in the photos below, we already had removed the grass from the vegetable garden beds. We constructed the beds with a mix of wood Alex had lying around. We pounded them into the ground with rebar from Home Depot. You’ll notice they aren’t in a perfectly straight line. I blame Alex, and of course, Alex blames me! Oh well. I don’t think it will be as noticeable once the beds are filled with vegetables anyway!
We learned our lesson with the crooked beds though, so we used a string with a pen attached to either end to make sure the surrounding fence would be straight. Grubbing out grass with a hoe is very hard work, and I am quite proud that I did a lot of the work below (Alex says half, I say two thirds!) on my own.


After grubbing out the grass, we used a small gas tiller to break up the hard soil and raked out the area to level the dirt. I love our little gas tiller. It really makes a huge difference when adding beds to your garden. If you are a committed gardener with plans to add a lot of beds, this is an excellent tool to have on hand.
Next, we spread out the wood chips. Alex is an arborist so he had wood chips left over from a tree removal he did earlier in the week. You can buy woodchips at your local garden supply store, or reach out to a local tree company and see if they would be willing to sell you some!


The photo above on the left is the view from our bedroom window. Although it is clear the beds are not straight (whoops!), I think we did a good job with our string at making sure the bed was straight before laying down the wood chips.
In the photo on the right, our fence materials had been delivered by Rusticraft. The split rails were each 11’ long so we had to custom-cut each rail to the length of our garden. To be completely honest, Alex was dreading this step. Of course, it would have been easier if the rails didn’t need to be cut, but in the end, it ended up not being so bad! We (I say we, but really, I only cut one or two myself) used Alex’s smallest chain saw and cut the rail straight through at the desired length. Then, each rail required one or two angled cuts to taper the end so it could fit into the post. It was not difficult, perhaps just a bit tedious because we had 27 rails, and I feel confident any homeowner with a chainsaw or sawzall could accomplish this with minimal issues.
Voila! Our fence project is complete. I will give Alex a week or two “off” until I surprise him with my next idea for the garden!
Pinterest and Instagram are so full of yummy ideas for the garden; both a delight for the mouth and my eyes! Here are some lovely inspiration pictures of beautiful vegetable gardens I want to share with you.


For now, we will eagerly wait for the average temperature to rise so that we can plant our warm-weather vegetables. We will plant tomatoes, cucumbers and peppers as we have in the past. This year, we will also try peas, cantaloupe, and if we have the room, onions and shallots.
I have been scouring Facebook Marketplace for a bistro set to put in the vegetable garden in place of the wrought iron bench which you see in my photo above. I’d like that bench, which was my Grandmother’s, to go outside the garden on the left-hand side. I plan to plant roses on either side of the gate.
I loved the garden bistro set below, but it sold within an hour of being put on Facebook and I was simply too slow. I also love a classic French-style bistro set, such as this one here from Ballard Designs. This is quite a bit pricier. I will keep looking on Facebook Marketplace in the meantime, but maybe if I can’t find anything else I will make the investment in a new set.
I will let you know once I decide on something suitable!
2023 UPDATE: Here is an updated photo after the split-rail vegetable garden fence has been in place for three seasons. The hydrangea and roses are growing in beautifully around the fence. I fertilize my hydrangeas religiously, up-to 3x per season with Holly-tone and have them on a drip irrigation system to help my extremely hot and sunny south-facing front yard.


